Mtk & Qualcomm 指纹架构安全
一、背景
1.1 评估目的
评估市场主流Android手机的指纹认证方案的架构设计,及其安全性。
1.2 评估思路
以Android的fingerprint框架为指导,对指纹验证的整条调用链路进行梳理,并做出安全评估。例如:
app > framework > service > hal > driver
流程、实现中。是否可能存在接口权限、中间数据、业务逻辑导致的风险。
1.3 评估设备
目前硬件TEE已经普及,所以主流指纹方案都依赖于TEE。所以芯片方案的差异会导致指纹方案具有较大的差异,为了能够兼顾市面上最主流的两款方案:MTK、QUALCOMM,所以挑选了两款分别搭载了这两大方案的设备进行评估:
- GIONEE M6 # 基于MT6755
- OPPO r9s # 基于MSM8953
当然目前市场上已经存在基于TEE方案的专业供应商,比如OPPO R9s就采用了Goodix供应商的指纹方案。
1.4 评估纬度
本次不会对指纹的核心比对算法进行安全评估,因为:
- 比对算法实现大多位于TEE中,无法接触到代码逻辑
- 比对算法涉及超出个人的能力范围
评估只针对数据传播、调用流程、权限管控等角度开展。
二、 Android原生Fingerprint框架
r9s的指纹识别框架是在Android标准框架上进行的,所以先从android原生框架入手了解
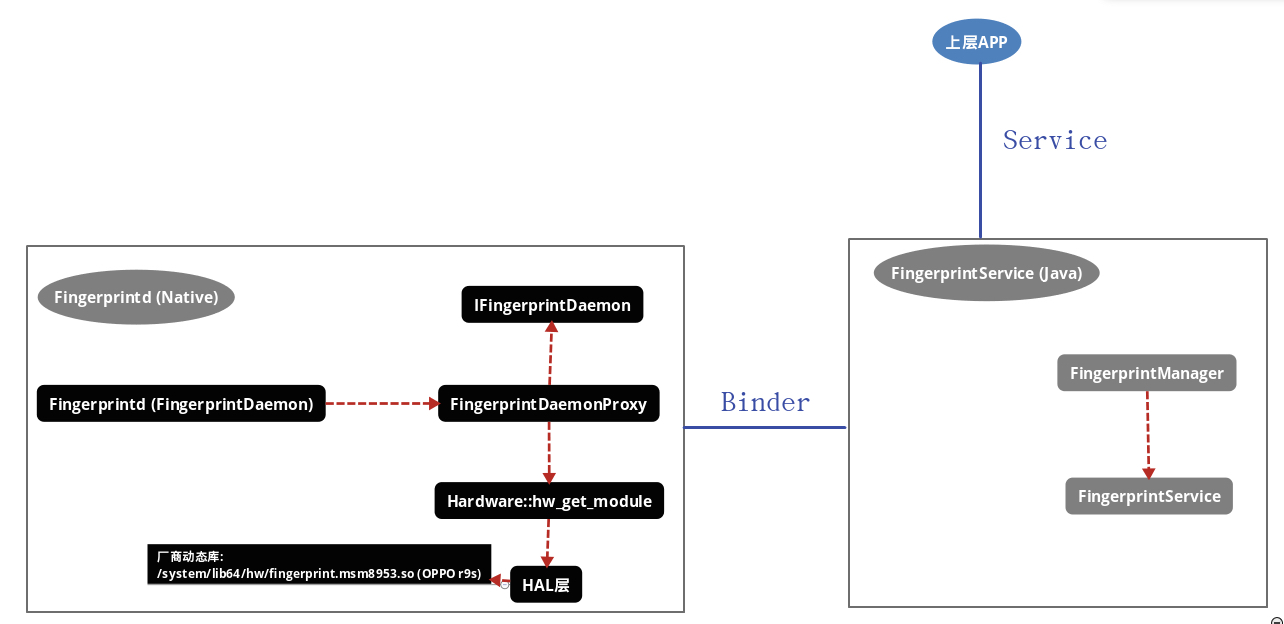
2.1 Fingerprintd (FingerprintdDaemon)
以6.01为例, 以下便是编译成fingerprintd的所有文件,源码位于: /system/core/fingerprintd/
Android.mk
fingerprintd.cpp
FingerprintDaemonProxy.cpp
FingerprintDaemonProxy.h
IFingerprintDaemon.cpp
IFingerprintDaemon.h
IFingerprintDaemonCallback.cpp
IFingerprintDaemonCallback.h
以上文件按功能可划分为四个部分:
| 文件 | 功能介绍 |
|---|---|
| fingerprintd.cpp | 负责将fingerprintd加入到ServiceManager中,以便Java层能够获取FingerprintService. |
| IFingerprintDaemon.h / .cpp | 负责fingerprintd与Java层ServiceManager的Binder通信. |
| IFingerprintDaemonCallback.h / .cpp | 同上,这里定义的是一些回调至ServiceManager的Callback接口. |
| FingerprintDaemonProxy.h / .cpp | 负责fingerprintd和Fignerprint hal层的通信. |
1. 在system_server进程启动后,class: SystemServer::startOtherServices()被调用,在这里FingerprintService服务会被start.
// xref: /frameworks/base/services/java/com/android/server/SystemServer.java
private void startOtherServices() {
            //...
           mSystemServiceManager.startService(TrustManagerService.class);
            mSystemServiceManager.startService(FingerprintService.class);  // 启动FingerprintService服务
            //...
 }
2. FingerprintService被start后,onStart()会尝试获取mDaemon与Pingerprintd建立连接。然后调用IFingerprintDaemon::openHal()初始化底层硬件.
// xref: /frameworks/base/services/core/java/com/android/server/fingerprint/FingerprintService.java
@Override
public void onStart() {
    publishBinderService(Context.FINGERPRINT_SERVICE, new FingerprintServiceWrapper());
    IFingerprintDaemon daemon = getFingerprintDaemon();
    if (DEBUG) Slog.v(TAG, "Fingerprint HAL id: " + mHalDeviceId);
    listenForUserSwitches();
}
// xref: /frameworks/base/services/core/java/com/android/server/fingerprint/FingerprintService.java
    public IFingerprintDaemon getFingerprintDaemon() {
        if (mDaemon == null) {
            mDaemon = IFingerprintDaemon.Stub.asInterface(ServiceManager.getService(FINGERPRINTD));
            if (mDaemon != null) {
                try {
                    mDaemon.asBinder().linkToDeath(this, 0);
                    mDaemon.init(mDaemonCallback);  // 设置回调函数
                    mHalDeviceId = mDaemon.openHal();  // 初始化硬件
        //...
        }
        return mDaemon;
    }
以上为ServiceManager -> fingerprintd的初始化流程。以下介绍fingerprintd -> hal -> hardware的初始化流程:
fingerprintd自身的代码位于: /system/core/fingerprintd/
1. fingerprintd收到openHal();的调用后会依照HAL的标准流程, 与指纹设备建立连接
// xref: /system/core/fingerprintd/FingerprintDaemonProxy.cpp
int64_t FingerprintDaemonProxy::openHal() {
    ALOG(LOG_VERBOSE, LOG_TAG, "nativeOpenHal()\n");
    int err;
    const hw_module_t *hw_module = NULL;
    if (0 != (err = hw_get_module(FINGERPRINT_HARDWARE_MODULE_ID, &hw_module))) {
        ALOGE("Can't open fingerprint HW Module, error: %d", err);
        return 0;
    }
    //...
    mModule = reinterpret_cast<const fingerprint_module_t*>(hw_module);
    //...
    hw_device_t *device = NULL;
    if (0 != (err = mModule->common.methods->open(hw_module, NULL, &device))) {
        ALOGE("Can't open fingerprint methods, error: %d", err);
        return 0;
    }
    if (kVersion != device->version) {
        ALOGE("Wrong fp version. Expected %d, got %d", kVersion, device->version);
        // return 0; // FIXME
    }
    mDevice = reinterpret_cast<fingerprint_device_t*>(device);

    err = mDevice->set_notify(mDevice, hal_notify_callback);
    //...
    // Sanity check - remove
    if (mDevice->notify != hal_notify_callback) {
        ALOGE("NOTIFY not set properly: %p != %p", mDevice->notify, hal_notify_callback);
    }
    ALOG(LOG_VERBOSE, LOG_TAG, "fingerprint HAL successfully initialized");
    return reinterpret_cast<int64_t>(mDevice); // This is just a handle
}
2. fingerprintd通过hw_get_module() 得到hw目录下厂商提供的指纹识别hal模块(如:/system/lib64/hw/fingerprint.default.so).
aosp中提供了一套fingerprint hal的空框架, 需要厂商自行实现,位于: /hardware/libhardware/modules/fingerprint/fingerprint.c
// xref: /hardware/libhardware/modules/fingerprint/fingerprint.c
static int fingerprint_open(const hw_module_t* module, const char __unused *id,
                            hw_device_t** device)
{
    if (device == NULL) {
        ALOGE("NULL device on open");
        return -EINVAL;
    }
    // ...
}
3. fingerprint.xxx.so加载后被fingerprintd调用其的fingerprint_open用于初始化该厂商自己的指纹模块。内部实现通过Android操作hal的标准接口
以上流程完成后,上层APP可以通过FingerprintManager或FingerprintManagerCompat(上层提供了两套接口,可任意选其一)进行指纹操作的使用.
三、GIONEE M6 底层实现(基于MT6755)
3.1 HAL初始化
1. 这里接上节,调用至hw_get_mogule()后, GIONEE M6上的“/system/lib64/hw/fingerprint.mt6755.so”被加载
在/system/libx/hw目录下的所有hal文件都会向外导出一个名为hw_module_t HAL_MODULE_INFO_SYM 的结构体符号.
这样系统可通过此导出结构体来得到一些关键信息, 比如下例中.methods字段中包含了有关指纹设备操作的关键函数:
// xref: /hardware/libhardware/modules/fingerprint/fingerprint.c
fingerprint_module_t HAL_MODULE_INFO_SYM = {
    .common = {
        .tag                = HARDWARE_MODULE_TAG,
        .module_api_version = FINGERPRINT_MODULE_API_VERSION_2_0,
        .hal_api_version    = HARDWARE_HAL_API_VERSION,
        .id                 = FINGERPRINT_HARDWARE_MODULE_ID,  //   <-- "fingerprint", 这里的字符串即为hw_get_mogule()的第一个参数.
        .name               = "FPC Fingrprint HAL",
        .author             = "Fingerprint Cards AB",
        .methods            = &fingerprint_module_methods,
    },
    .init = fpc_module_open, };
编译后表现为名为HMI的导出符号:

2. 这里以FingerprintDaemonProxy::openHal(对应fingerprintd中名为”nativeOpenHal”的native函数)为起点继续对 fingerprint.mt6755.so 进行分析.
进入后,首先调用hw_get_module("fingerprint", &v18);对hal进行加载,这里对应的hal为: fingerprint.mt6755.so :
// pos: fingerprintd
__int64 __fastcall nativeOpenHal(__int64 a1, __int64 a2, __int64 a3, void *a4, void *a5)
{  v5 = a1;
  __android_log_print(2LL, (__int64)"fingerprintd", "nativeOpenHal()\n", a4, a5);
  v18 = 0LL;
  v6 = hw_get_module("fingerprint", &v18);  // <-- 首先加载hal模块: fingerprint.mt6755.so, 执行结束后v12+128将被置为fpc_set_notify指针
  if ( v6 )
  {
    __android_log_print(6LL, (__int64)"fingerprintd", "Can't open fingerprint HW Module, error: %d", (void *)v6, v7);
    result = 0LL;
        // ...
          *(_QWORD *)(v5 + 48) = v12;
          v14 = (*(__int64 (__fastcall **)(__int64, __int64 (__fastcall *)(_DWORD *)))(v12 + 128))(v12, sub_5228);  // fpc_set_notify() <--  这里注册指纹通知
          if ( v14 & 0x80000000 )
          {
          // ...
          }
          else
          {
            v16 = *(__int64 (__fastcall **)(_DWORD *))(*(_QWORD *)(v5 + 48) + 120LL);
            if ( v16 != sub_5228 )
              __android_log_print(6LL, (__int64)"fingerprintd", "NOTIFY not set properly: %p != %p", v16, sub_5228);
            __android_log_print(2LL, (__int64)"fingerprintd", "fingerprint HAL successfully initialized", v16, v15);
            result = *(_QWORD *)(v5 + 48);
          }
        }
      }
     // ...
  }
  return result;
}
3. 当hw_get_module("fingerprint", &v18);被调用后, fingerprint.mt6755.so 即被加载并触发init方法fpc_model_open:
// pos: fingerprint.mt6755.so
signed __int64 __fastcall fpc_module_open(__int64 a1, __int64 a2, __int64 *a3)
{
  __int64 *v3; // x20@1
  __int64 v4; // x24@1
  __int64 v5; // x19@1
  __int64 v6; // x0@2
  unsigned int v7; // w23@3
  __int64 v8; // x0@4
  __int64 v9; // x0@5

  v3 = a3;
  v4 = a1;
  __android_log_print(3LL, "fpc_fingerprint_hal", "%s", "fpc_module_open");
  __android_log_print(3LL, "fpc_fingerprint_hal", "%s", "gn_fpc_hw_reset");
  gn_sysfs_node_write("/sys/devices/fpc_interrupt/hw_reset", "reset");
  *v3 = 0LL;
  v5 = malloc(4528LL);
  if ( !v5 )
    return (unsigned int)-12;
  memset();
  pthread_mutex_init(v5 + 256, 0LL);
// 填充指纹操作函数,此函数返回后. 该结构体将以参数形式从hw_get_module()中返回.
  *(_QWORD *)(v5 + 8) = v4;
  *(_DWORD *)(v5 + 4) = 512;
  *(_DWORD *)v5 = 0x48574454;
  *(_QWORD *)(v5 + 0x70) = fpc_module_close;
  *(_QWORD *)(v5 + 0x90) = fpc_enroll;
  *(_QWORD *)(v5 + 0xA8) = fpc_cancel;
  *(_QWORD *)(v5 + 0xB8) = fpc_remove;
  *(_QWORD *)(v5 + 0x80) = fpc_set_notify;
  *(_QWORD *)(v5 + 0x78) = 0LL;
  *(_QWORD *)(v5 + 0xC8) = fpc_authenticate;
  *(_QWORD *)(v5 + 0x88) = fpc_pre_enroll;
  *(_QWORD *)(v5 + 0xB0) = fpc_enumerate;
  *(_QWORD *)(v5 + 0xA0) = fpc_get_authenticator_id;
  *(_QWORD *)(v5 + 0xC0) = fpc_set_active_group;
  *(_QWORD *)(v5 + 0x98) = fpc_post_enroll;
  v6 = fpc_tee_init();
  *(_QWORD *)(v5 + 328) = v6;
  if ( v6 )
  {
    v7 = fpc_tee_init_hw_auth();
    if ( !v7 )
    {
      v8 = fpc_worker_new();
      *(_QWORD *)(v5 + 248) = v8;
      if ( v8 )
      {
        v9 = fpc_sensortest_new(v5, *(_QWORD *)(v5 + 304));
        *(_QWORD *)(v5 + 296) = v9;
        if ( v9 )
        {
          fpc_extension_start(*(_QWORD *)(v5 + 304), v9, *(_QWORD *)(v5 + 312), *(_QWORD *)(v5 + 320));
          *v3 = v5;
          fingerprint_hal_resume(v5);
          return v7;
        }
      }
    }
  }
  __android_log_print(6LL, "fpc_fingerprint_hal", "%s failed\n", "fpc_module_open");
  fpc_module_close((_QWORD *)v5);
  return 0xFFFFFFFFLL;
}
4. 以上函数调用完成,返回至fingerprintd中的nativeOpenHal(). 这样fingerprint.mt6755.so内的fpc_set_notify函数指针会被fingerprintd调用,用来设置指纹事件回调.
这里的回调最终会通过Binder调用到Java层当初设置的mCallback中(IFingerprintDaemon::init(mCallback)).
// pos: fingerprintd
v14 = (*(__int64 (__fastcall **)(__int64, __int64 (__fastcall *)(_DWORD *)))(v12 + 128))(v12, sub_5228);  // fpc_set_notify() <--  这里注册指纹通知
3.2 指纹验证流程
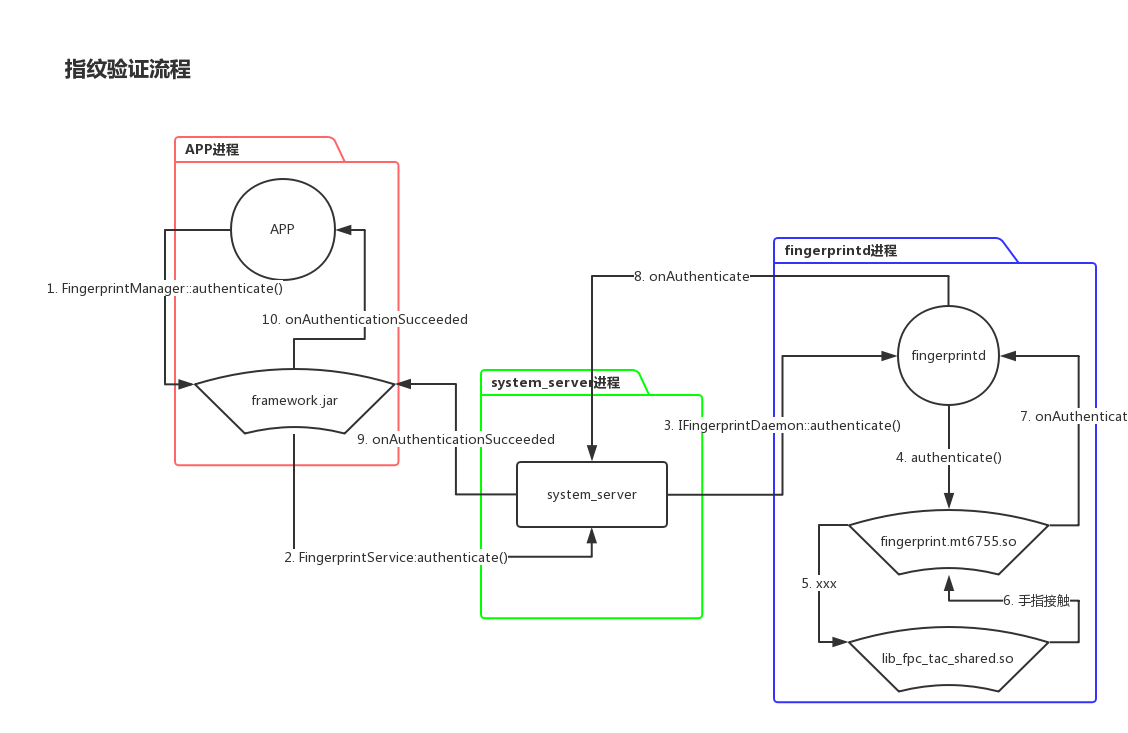
1. 当应用层调用framework.jar中的FingerprintManager::authenticate()方法时,会先进行参数的转换,以便后续调用到services.jar中的FingerprintService::authenticate():
转换方法如下:
// pos: framework.jar
// xref: /frameworks/base/services/core/java/com/android/server/fingerprint/AuthenticationClient.java
@RequiresPermission(USE_FINGERPRINT)
public void authenticate(@Nullable CryptoObject crypto, @Nullable CancellationSignal cancel,
        int flags, @NonNull AuthenticationCallback callback, @Nullable Handler handler) {
    authenticate(crypto, cancel, flags, callback, handler, UserHandle.myUserId());  // 调用到“内层 authenticate()”函数,前面的参数都不变,最后一个参数传入当前UserId
}

// 内层authenticate
/**
 * Per-user version
 * @hide
 */
@RequiresPermission(USE_FINGERPRINT)
public void authenticate(@Nullable CryptoObject crypto, @Nullable CancellationSignal cancel,
        int flags, @NonNull AuthenticationCallback callback, Handler handler, int userId) {
    // ...
    if (mService != null) try {
        useHandler(handler);
        mAuthenticationCallback = callback;
        mCryptoObject = crypto;
        long sessionId = crypto != null ? crypto.getOpId() : ;
        // 从这里开始,调用到FingerprintService
        mService.authenticate(mToken,   // 这里是一个空的Binder,通过 new Binder()创建的   作用不明?
            sessionId,  // 这里通过crypto.getOpId()得到,在FingerprintService中称为opId
            userId,   // 当前调用者的用户Id
            mServiceReceiver, // 这里是指纹验证结果的回调,结果会通过此传回
            flags,  // 直接传递,不转换
            mContext.getOpPackageName());  // 调用方的包名
    } catch (RemoteException e) {
        Log.w(TAG, "Remote exception while authenticating: ", e);
        if (callback != null) {
            // Though this may not be a hardware issue, it will cause apps to give up or try
            // again later.
            callback.onAuthenticationError(FINGERPRINT_ERROR_HW_UNAVAILABLE,
                    getErrorString(FINGERPRINT_ERROR_HW_UNAVAILABLE));
        }
    }
}
2. 当应用层调用FingerprintService时,会进入在system_server中的FingerprintService$FingerprintServiceWrapper
之所以会进入Wrapper, 是因为FingerprintService在启动时将其与标识”fingerprint”进行了绑定:
// pos: services.jar
// xref:  /frameworks/base/services/core/java/com/android/server/fingerprint/FingerprintService.java
public void onStart() {
    this.publishBinderService("fingerprint", new FingerprintServiceWrapper(this, null)); // <-- 绑定
    this.getFingerprintDaemon();
    this.listenForUserSwitches();
    this.initPrivateFingerprint();
}
3. 进入FingerprintService$FingerprintServiceWrapper::authenticate():
// pos: services.jar
// xref: /frameworks/base/services/core/java/com/android/server/fingerprint/FingerprintService.java
public void authenticate(IBinder IToken, long opId, int groupId, IFingerprintServiceReceiver Receiver, int nFlags, String opPackageName) {
    if(!FingerprintService.canUseFingerprint_(FingerprintService.this, opPackageName, true)) {
        return;
    }
    if(this.getPrivateStatus()) {
        // 如果调用者APP为隐私空间,就进入此流程
        if(!opPackageName.equals("com.gionee.encryptspace") && !opPackageName.equals(FingerprintService.getKeyguardPackage(FingerprintService.this)) && !opPackageName.equals("com.gionee.amisystem")) {
            goto label_74;
        }

        Slog.d("FingerprintService", "authenticate :" + opPackageName);  // private app /
        FingerprintService.setPrivateFingerPackageName_(opPackageName);
    }
    else {
    label_74:
        FingerprintService.setPrivateFingerPackageName_(null);
    }
    int nEffectiveGroupId = FingerprintService.this.getEffectiveUserId(groupId);
    boolean bRestricted = this.isRestricted();
    if(((FingerprintService.inLockoutMode_(FingerprintService.this)) || (FingerprintService.getRestricted())) && (opPackageName.equals(FingerprintService.getKeyguardPackage(FingerprintService.this))) || (opPackageName.equals("com.gionee.amisystem"))) {
         // 如果调用者APP为Keyguard或com.gionee.amisystem
        // ...
        if(FingerprintService.inLockoutMode_(FingerprintService.this)) {
            FingerprintService.this.mHandler.postDelayed(FingerprintService.getStartAuthenticationRunnable(FingerprintService.this), 60000);
            return;
        }
        FingerprintService.this.mHandler.postDelayed(FingerprintService.getStartAuthenticationRunnable(FingerprintService.this), 500);
    }
    else {
        // 如果调用者APP为普通应用
        if(FingerprintService.getToken() != null && FingerprintService.getReceiver() != null) {  // other app
            FingerprintService.this.mHandler.removeCallbacks(FingerprintService.getStartAuthenticationRunnable(FingerprintService.this));
            FingerprintService.clearAuthenticationData_(FingerprintService.this);
        }
        FingerprintService.this.mHandler.post(new Runnable(opId, IToken, nEffectiveGroupId, Receiver, nFlags, bRestricted) {
            public void run() {
                // ...
                this.this$1.this$0.startAuthentication(this.val$token, this.val$opId, this.val$effectiveGroupId, this.val$receiver, this.val$flags, this.val$restricted);
            }
        });
    }
}
4. 接上面,跟进startAuthentication(), 这里最后调用了IFingerprintDaemon::authenticate(). 然后通过Binder调用到真正的Server,也就是fingerprintd(FingerprintDaemonProxy.cpp)中:
// pos: services.jar
// xref: /frameworks/base/services/core/java/com/android/server/fingerprint/FingerprintService.java
void startAuthentication(IBinder IBinder, long opId, int UserId, IFingerprintServiceReceiver receiver, int flags, boolean restricted) {
    if(this.isSimulated()) {
        this.mAuthClient = new ClientMonitor(this, IBinder, opId, receiver, UserId, restricted);
        this.handleAuthenticated(547483734688L, 295219575, UserId);
        return;
    }
    IFingerprintDaemon v13 = this.getFingerprintDaemon();  // 得到FingerprintDaemon对象
    if(v13 == null) {
        Slog.w("FingerprintService", "startAuthentication: no fingeprintd!");
        return;
    }
   // ...
    try {
        int v15 = v13.authenticate(opId, UserId);   // <-- 调用到fingerprintd中fingerprint.mt6755.so的authenticate()函数
        if(v15 == 0) {
            return;
        }
    }
   // ...
}
从这里开始,执行的流程将从上面的sytem_server进入fingerprintd进程。
5. 以上system_server中的JAVA代码调用v13.authenticate()后,流程将进入fingerprintd进程内fingerprint.mt6755.so模块中的authenticate()函数:
// pos: fingerprint.mt6755.so
__int64 __fastcall fpc_authenticate(tagDevice *a1, __int64 operation_id, int current_gid__or__current_user_id)
{
  __int64 operation_id_1; // x23@1
  int current_gid; // w24@1
  tagDevice *obj_device; // x19@1
  tagTask *pTask; // x0@3
  unsigned int v7; // w23@3

  operation_id_1 = operation_id;
  current_gid = current_gid__or__current_user_id;
  obj_device = a1;
  __android_log_print(3LL, "fpc_fingerprint_hal", "%s operation_id %lu\n", "fpc_authenticate", operation_id);
  pthread_mutex_lock((pthread_mutex_t *)&obj_device->pMutex);
  fingerprint_hal_goto_idle();
  if ( obj_device->fun_notify_callback )
  {
    if ( *(_DWORD *)&obj_device->gid == current_gid )
    {
      pTask = obj_device->pTask;
      obj_device->operation_id = operation_id_1;
      v7 = 0;
      fpc_worker_set_task(pTask, (__int64)func_authenticate_callback, obj_device);   // <-- 这里设置手指接触任务回调: arg0: obj_work, arg1: func_callback, arg2: obj_device
    }
    else
    {
      v7 = -1;
      __android_log_print(3LL, "fpc_fingerprint_hal", "%s finger.gid != current_gid\n", "fpc_authenticate");
    }
  }
  else
  {
    v7 = -1;
    __android_log_print(6LL, "fpc_fingerprint_hal", "%s failed notify not set\n", "fpc_authenticate");
  }
  fingerprint_hal_resume(obj_device);  // <-- 通过以上fpc_worker_set_task设置好任务后, 这里恢复运行,当有手指触摸时将会回调至func_authenticate_callback
  pthread_mutex_unlock(&obj_device->pMutex);
  return v7;
}
6. 当用户用手指触摸指纹后,上面设置的func_authenticate_callback会被立刻调用:
当该函数被调用时,指纹的“抓取”和“验证”其实还没有开始,该函数的任务就是“抓取”和“验证”指纹:
// pos: fingerprint.mt6755.so
__int64 __fastcall func_authenticate_callback(__int64 a1)
{
  pDevice = (tagDevice *)a1;
  log(6LL, "fpc_fingerprint_hal", "fpc:%s\n", "do_authenticate");
  status_1 = fpc_tee_set_auth_challenge(pDevice->pTee, pDevice->operation_id);
  if ( !status_1 )
  {
    is_capture_failed = 1;
    if ( !pDevice->operation_id )
    {
      status_2 = gn_fpc_tee_capture_image(pDevice->pTee);  // 抓取指纹“图像”
      is_capture_failed = 0;
      if ( status_2 )
      { //  抓取失败
        if ( status_2 > 0 )
        {
          notify_callback_5 = (void (__fastcall *)(tagNotify *))pDevice->fun_notify_callback;
          ret.type = 1;  // 1. 表示此条通知是:抓取指纹“图像”结果
          ret.nGroupId = 5;  // 5.表示抓取失败
          notify_callback_5(&ret);  // do notify
          log(6LL, "fpc_fingerprint_hal", "gn_fpc_tee_capture_image fails:FINGERPRINT_ACQUIRED_TOO_FAST\n");
        }
        log(6LL, "fpc_fingerprint_hal", "gn_fpc_tee_capture_image fails\n");
        is_capture_failed = 1;
      }
    }
    if ( is_capture_failed != 1 )
      goto CAPTURE_SUCCEED;
  // 继续尝试抓取指纹
    while ( 1 )
    {
      while ( 1 )
      {
        v5 = fpc_tee_capture_image(pDevice->pTee);
        status_1 = v5;
        if ( v5 <= 0 )
          break;
        log(6LL, "fpc_fingerprint_hal", "capture image failed!");
        ret.type = 1;
        notify_callback_3 = (void (__fastcall *)(tagNotify *))pDevice->fun_notify_callback;
        ret.nGroupId = 5;
        notify_callback_3(&ret);
      }
      if ( v5 )
        break;
CAPTURE_SUCCEED:
      notify_callback_2 = (void (__fastcall *)(tagNotify *))pDevice->fun_notify_callback;
      v19.type = 1;
      v19.nGroupId = 0;  // 抓取指纹成功
      notify_callback_2(&v19);  // do notify
      status = fpc_tee_identify(pDevice->pTee, &nFingerprint);  // 得到刚才抓取的指纹.nFingerprint
      status_1 = status;
      if ( status )
      {
        log(6LL, "fpc_fingerprint_hal", "fpc_tee_identify fails status=%d\n", status);
        break;
      }
      if ( nFingerprint )
      {
        status_1 = fpc_tee_get_auth_result(pDevice->pTee, &auth_result);  // 检查该指纹的授权信息
        if ( status_1 )
          break;
        log(
          3LL,
          "fpc_fingerprint_hal",
          "hat->challenge %lu\n"
          "hat->authenticator_id %lu\n"
          "hat->authenticator_type %u\n"
          "hat->timestamp %lu\n"
          "hat->user_id %lu\n"
          "hat->version %hhu\n",
          auth_result.challenge,
          auth_result.authenticator_id,
          (unsigned int)auth_result.authenticator_type,
          auth_result.timestamp,
          auth_result.user_id);
        gid = pDevice->gid;
        notify_callback_4 = (void (__fastcall *)(tagNotify *))pDevice->fun_notify_callback;
        ret.nFingerprint =.nFingerprint;  // 指纹验证成功,回传指.nFingerprint
        ret.type = 5;
        ret.nGroupId = gid;
        notify_callback_4(&ret); // do notify
        pTee = pDevice->pTee;
        return fpc_tee_store_template_db();
      }
      gid_2 = pDevice->gid;
      notify_callback = (void (__fastcall *)(tagNotify *))pDevice->fun_notify_callback;
      ret.type = 5;
      ret.nGroupId = gid_2;
      ret.nFingerprint = 0;  // 指纹验证失败
      notify_callback(&ret);                    // do notify
    }
  }
  pError = fpc_error_str(status_1);
  result = log(6LL, "fpc_fingerprint_hal", "%s failed %s\n", "do_authenticate", pError);
  if ( status_1 != -7 )
  {
    notify_callback_1 = (__int64 (__fastcall *)(tagNotify *))pDevice->fun_notify_callback;
    ret.type = -1;  // 失败。。。
    ret.nGroupId = 1;
    result = notify_callback_1(&ret);           // notify
  }
  return result;
}
7. 当以上验证操作完成并调用notify_callback()反馈结果后,流程会回到fingerprintd(主模块)中的notify_callback:
在以下case 6分支中通过Binder调用system_server中的IFingerprintDaemonCallback::onAuthenticated(),这时FingerprintService便收到了指纹识别事件。
// pos: fingerprintd
__int64 __fastcall notify_callback(_DWORD *pNotify, __int64 a2, __int64 a3, void *a4, void *a5)
{
  pNotify_1 = (tagNotify *)pNotify;
  pDaemonProxy = (_QWORD *)android::FingerprintDaemonProxy::sInstance;
  if ( !android::FingerprintDaemonProxy::sInstance )
  {
    pDaemonProxy = (_QWORD *)operator new(0x50uLL);
    CFingerprintDeamonProxy__CFingerprintDeamonProxy(pDaemonProxy);
    android::FingerprintDaemonProxy::sInstance = (__int64)pDaemonProxy;
  }
  v7 = (_QWORD *)pDaemonProxy[7];
  v13 = v7;
  if ( v7 && (android::RefBase::incStrong((android::RefBase *)((char *)v7 + *(_QWORD *)(*v7 - 24LL)), &v13), v13) )
  {
    type = (void *)(unsigned int)pNotify_1->type;
    v9 = pDaemonProxy[6];
    type_1 = (void *)(unsigned int)((_DWORD)type + 1);  // 这里的type+1
    switch ( (_DWORD)type_1 )
    {
      case 0:                                   // onError
        __android_log_print(
          3LL,
          (__int64)"fingerprintd",
          "onError(%d)",
          (void *)(unsigned int)pNotify_1->nGroupId,
          type_1);
        result = (*(__int64 (__fastcall **)(_QWORD *, __int64, _QWORD))(*v13 + 48LL))(
                   v13,
                   v9,
                   (unsigned int)pNotify_1->nGroupId);
        break;
      case 2:                                   // onAcquired
        __android_log_print(
          3LL,
          (__int64)"fingerprintd",
          "onAcquired(%d)",
          (void *)(unsigned int)pNotify_1->nGroupId,
          type_1);
        result = (*(__int64 (__fastcall **)(_QWORD *, __int64, _QWORD))(*v13 + 32LL))(
                   v13,
                   v9,
                   (unsigned int)pNotify_1->nGroupId);
        break;
      case 4:                                   // onEnrollResult
        __android_log_print(
          3LL,
          (__int64)"fingerprintd",
          "onEnrollResult.nFingerprint=%d, gid=%d, rem=%d)",
          (void *)(unsigned int)pNotify_1->nFingerprintId,
          (void *)(unsigned int)pNotify_1->nGroupId,
          (unsigned int)pNotify_1[1].type);
        result = (*(__int64 (__fastcall **)(_QWORD *, __int64, _QWORD, _QWORD, _QWORD))(*v13 + 24LL))(
                   v13,
                   v9,
                   (unsigned int)pNotify_1->nFingerprintId,
                   (unsigned int)pNotify_1->nGroupId,
                   (unsigned int)pNotify_1[1].type);
        break;
      case 5:                                   // onRemove
        __android_log_print(
          3LL,
          (__int64)"fingerprintd",
          "onRemove.nFingerprint=%d, gid=%d)",
          (void *)(unsigned int)pNotify_1->nFingerprintId,
          (void *)(unsigned int)pNotify_1->nGroupId);
        result = (*(__int64 (__fastcall **)(_QWORD *, __int64, _QWORD, _QWORD))(*v13 + 56LL))(
                   v13,
                   v9,
                   (unsigned int)pNotify_1->nFingerprintId,
                   (unsigned int)pNotify_1->nGroupId);
        break;
      case 6:                                   // onAuthenticated     指纹验证结果
        __android_log_print(
          3LL,
          (__int64)"fingerprintd",
          "onAuthenticated.nFingerprint=%d, gid=%d)",
          (void *)(unsigned int)pNotify_1->nFingerprintId,
          (void *)(unsigned int)pNotify_1->nGroupId);
       .nFingerprint = 0LL;
        if ( pNotify_1->nFingerprintId )
        {
          sub_4AF4((android *)&pNotify_1[1]);
         .nFingerprint = (unsigned int)pNotify_1->nFingerprintId;
        }
        result = (*(__int64 (__fastcall **)(_QWORD *, __int64, __int64, _QWORD))(*v13 + 40LL))(    // 这里直接通过Binder调用到system_server的IFingerprintDaemonCallback::onAuthenticated()中.
                   v13,
                   v9,
                  .nFingerprint,
                   (unsigned int)pNotify_1->nGroupId);
        break;
      case 7:                                   // onFingerDown
        __android_log_print(3LL, (__int64)"fingerprintd", "onFingerDown()", type, type_1);
        result = (*(__int64 (__fastcall **)(_QWORD *, __int64))(*v13 + 72LL))(v13, v9);
        break;
      case 8:                                   // onFingerUp
        __android_log_print(3LL, (__int64)"fingerprintd", "onFingerUp()", type, type_1);
        result = (*(__int64 (__fastcall **)(_QWORD *, __int64))(*v13 + 80LL))(v13, v9);
        break;
      case 9:                                   // onWaittingFinger
        __android_log_print(3LL, (__int64)"fingerprintd", "onWaittingFinger()", type, type_1);
        result = (*(__int64 (__fastcall **)(_QWORD *, __int64))(*v13 + 88LL))(v13, v9);
        break;
      case 0xA:                                 // onTestCmd
        __android_log_print(
          3LL,
          (__int64)"fingerprintd",
          "onTestCmd(cmd=%d, result=%d)\n",
          (void *)(unsigned int)pNotify_1->nGroupId,
          (void *)(unsigned int)pNotify_1->nFingerprintId);
        result = (*(__int64 (__fastcall **)(_QWORD *, __int64, _QWORD, _QWORD))(*v13 + 96LL))(
                   v13,
                   v9,
                   (unsigned int)pNotify_1->nGroupId,
                   (unsigned int)pNotify_1->nFingerprintId);
        break;
      default:
        result = __android_log_print(6LL, (__int64)"fingerprintd", "invalid msg type: %d", type, type_1);
        break;
    }
  }
  else
  {
    result = __android_log_print(6LL, (__int64)"fingerprintd", "Invalid callback object", a4, a5);
  }
  if ( v13 )
    result = android::RefBase::decStrong((android::RefBase *)((char *)v13 + *(_QWORD *)(*v13 - 24LL)), &v13);
  return result;
}
从这里开始,流程将从fingerprintd进程再次回到system_server中,触发指纹事件回调
8. 收到指纹事件回调, 流程回到system_server中的AuthenticationClient::onAuthenticated()
在这个函数中,看到了熟悉的onAuthenticationFailed与onAuthenticationSucceeded的调用:
// pos: services.jar
// xref: /frameworks/base/services/core/java/com/android/server/fingerprint/AuthenticationClient.java
@Override
public boolean onAuthenticated(int fingerId, int groupId) {
    boolean result = false;
    boolean authenticated = fingerId != ;

    IFingerprintServiceReceiver receiver = getReceiver();
    if (receiver != null) {
        try {
            MetricsLogger.action(getContext(), MetricsEvent.ACTION_FINGERPRINT_AUTH,
                    authenticated);
            if (!authenticated) {
                receiver.onAuthenticationFailed(getHalDeviceId());   // 指纹验证失败,回调至framework(应用层)。
            } else {
                if (DEBUG) {
                    Slog.v(TAG, "onAuthenticated(owner=" + getOwnerString()
                            + ", id=" + fingerId + ", gp=" + groupId + ")");
                }
                Fingerprint fp = !getIsRestricted()
                        ? new Fingerprint("" /* TODO */, groupId, fingerId, getHalDeviceId())
                        : null;
                receiver.onAuthenticationSucceeded(getHalDeviceId(), fp, getTargetUserId());  // 指纹验证成功,回调至framework(应用层)。
            }
        } catch (RemoteException e) {
            Slog.w(TAG, "Failed to notify Authenticated:", e);
            result = true; // client failed
        }
    } else {
        result = true; // client not listening
    }
}
至此,指纹的验证流程全部梳理完成(从应用->HAL层)
四、OPPO r9s 底层实现
4.1 fingerprintd到hal大致流程
OPPO r9s采用的是Qualcomm 骁龙625(MSM8953),指纹传感器为: goodix.
指纹相关的文件:
/system/lib64/hw/fingerprintd 加载fingerprint.msm8953.so实现功能, 负责建立ServiceManager与HAL的通讯。 /system/lib64/hw/fingerprint.msm8953.so 提供fingerprint hal外层的接口, 最终通过调用lib_fpc_tac_shared.so实现功能。
/system/lib64/lib_fpc_tac_shared.so 提供与TruztZone通讯的操作。
4.2 指纹验证流程
主要流程会由fingerprint.msm8953.so?(do_authenticate)实现:
int __fastcall do_authenticate(int a1)
{
 // ...
  _android_log_print(3, "fpc_hal", "%s", "do_authenticate");
   // ...
      while ( 1 )
      {
        v10 = capture_image(v1, 0, i, i, 0);    // 抓取指纹图像
        v4 = v10;
        if ( (unsigned int)v10 > 2 )
        {
          v5 = (int)"fpc_hal";
          v28 = v10;
          v7 = "%s capture_image failed with status = %d";
          v6 = (int)"do_authenticate";
          goto LABEL_10;
        }
        memset(&s, 0, 0x58u);
        v11 = *(void (__fastcall **)(_DWORD))(v1 + 64);
        s = 1;
        v11(&s);
        if ( v4 == 1 )
        {
          memset(&v31, 0, 0x18u);
          _android_log_print(3, "fpc_hal", "%s clear identify data\n", "do_authenticate");
        }
        else
        {
          v12 = fpc_tee_identify(*(_DWORD *)(v1 + 200), (int)&is_auth_succeed, (int)&v31);  // 判断该指纹是否已被录入
          v4 = v12;
          if ( v12 )
          {
            v5 = (int)"fpc_hal";
            v7 = "%s fpc_tee_identify failed with status = %d";
            v28 = v12;
            v6 = (int)"do_authenticate";
            goto LABEL_10;
          }
        }
      //...
        if ( is_auth_succeed )
        {
          memset(&s, 0, 0x58u);
          v4 = fpc_tee_get_auth_result(*(_DWORD *)(v1 + 200), (int)&v40);
          if ( !v4 )
          {
           // ...
          }
        if ( (unsigned int)dword_91A8 > 1 )
          break;
        _android_log_print(3, "fpc_hal", "%s identify failed!! try again", "do_authenticate");  // 指纹验证失败
        i = 0;
}
1. 进入等待验证指纹的状态:
callstack(自下向上):
lib_fpc_tac_shared.so?00005278(monitor_trigger)
lib_fpc_tac_shared.so?00003890(fpc_tee_wait_finger_lost)
lib_fpc_tac_shared.so?00003B38(fpc_tee_wait_finger_down)
lib_fpc_tac_shared.so?00004E64(fpc_tee_capture_image)
fingerprint.msm8953.so?00001F80(capture_image) <– 抓取指纹图像
fingerprint.msm8953.so?000022FC(do_authenticat)`
2. 该指纹是否已入库(猜测):
callstack(自下向上):
ioctl()
libQSEEComAPI.so?00001FE4 (__QSEECom_send_modified_cmd)
lib_fpc_tac_shared.so?00005964(fpc_tac_transfer)
fingerprint.msm8953.so?000022FC(do_authenticat)
3. 如果入库,判断是否被允许通过(猜测):
callstack(自下向上):
lib_fpc_tac_shared.so?00005964(fpc_tac_transfer)
lib_fpc_tac_shared.so?00004C98(fpc_tee_get_auth_result)
fingerprint.msm8953.so?000022FC(do_authenticat)`
4.3 上层框架
com.coloros.fingerprint 负责对指纹解锁或图形解锁的开关,及其他相关的操作。
该APP使用以下4种receiver的Action,用于接受跟指纹配置相关的操作:
oppo.intent.action.CLOSE_FINGERPRINT_UNLOCK # 关闭指纹解锁
oppo.intent.action.PASSWORD_QUALITY_UNSPECIFIED # 设置锁屏密码强度
oppo.intent.action.DELETE_FINGERPRINTS # 删除所有指纹数据
oppo.intent.action.SET_UNLOCK_PASSWORD # 设置锁屏密码`
该APP收到广播后最终会将其写入自身目录下的fingerprint_preferences.xml和com.coloros.fingerprint_preferences.xml。
其他的应用会通过广播来设置指纹相关的操作:
com.coloros.filemanager (文件管理器,加解密文件)
com.android.keyguard (锁屏界面,请求验证密码)
com.android.settings (系统设置,打开和关闭指纹解锁或图形解锁)
com.coloros.safecenter (安全中心,同上)
com.nearme.statistics.rom (作用不明)
com.coloros.wirelesssettings (其它无线链接,作用不明)
所有发送此广播的APP需要拥有com.coloros.fingerprint.permission.DELETE_FINGERPRINT权限,权限等级为signatureOrSystem,所以并无风险。
五、总结
- 两种方案评估后,数据传递、关键逻辑中没有明显缺陷,未发现安全风险。